Products
Solutions
Resources
9977 N 90th Street, Suite 250 Scottsdale, AZ 85258 | 1-800-637-7496
© 2024 InEight, Inc. All Rights Reserved | Privacy Statement | Terms of Service | Cookie Policy | Do not sell/share my information

The following steps walk you through creating a new issue in InEight Change. The Add new Issue wizard lets you add supporting documents and vendors in a single operation. Vendors added with the issue show in the Vendors grid on the issue's Details page.
If supporting documents or vendor information, you can edit the new issue later.
When an issue occurs in your project, you can create a new issue record from the New Issue page or the Issue log.
Considerations: These instructions assume that you have supporting documents and vendor information. If you do not have this information, you can click Add or Add and New to quickly add the issue. If workflow is configured at the issue level, you can click Submit for approval. You can return to the issue later.
From the New issue page or the issue log, click the Add issue icon. The Add new issue wizard opens.
Enter the issue name and issue start date. You can also optionally enter the ROM, a description of the issue, and other detailed information.
Click Next to go to the Add supporting documents page and then add supporting documents information. For more information about adding supporting documents, see Supporting documents. If you do not have supporting documents, go to the next step.
Click Next to go to the Add Vendors page and then select vendors from the list.
Add or submit as follows:
If workflow is not configured, click Add to add this issue or Add and next to add an additional issue.
If workflow is configured, click Submit for approval to submit for approval or Add and next to add an additional issue.
If approval is not configured or if you are the first approver in the workflow, the issue is added to the New issue page and the Issue log with an issue ID assigned and an issue status of New. If a workflow is configured and you are not the first approver, the issue is added to the New issue log with a status of Pending. If you added vendors, they are added to the Vendors grid on the issue's Details page.
How the Issue ID, Issue status, and Issue approval status of a new issue are assigned depends on whether workflow is configured.
When workflow is not configured, the issue is added to the New issue page and the Issue log with an issue ID assigned. The issue status is New, and the issue approval status is Not applicable.
When workflow is configured and the person who created the issues is also the first approver in the workflow, the issue is automatically approved for the first step. The issue is added to the New issue page and the issue log with an issue ID assigned and an issue status of New. The issue approval status is Approved. When you hover over the issue approval status, it shows that it has been approved for the first step and is in step 2, if there is a step 2.
When workflow is configured and the person who created the issue is not the first approver in the workflow, the first approver (either a person or a role) receives an email letting them know there is an issue to be approved. The issue is added to the New Issue page with an issue ID of Pending, an issue status of New, and an issue approval status of In approval. The issue is not added to the issue log until it has gone through all the approval steps.
When issues have been rejected in workflow, they show in the New Issue log with the Issue ID Rejected, so they can be quickly identified. Rejected issues are disabled, so you can no longer see the issues. InEight recommends using the Comments section in the workflow to describe the issue and the reason it was rejected.
When the issue is in workflow, Change allows you to add supporting documents and edit fields that might help the reviewers in making approval decisions. To open the pending issue, click the Pending link in the Issue ID column of the New issue log. The Issue Details page opens, and you can then edit any field that is enabled. You can also go to the Supporting documents tab to add documents.
You can also import issues from a template. See "Issue Import" for information about importing issues.
Contract users can also add an issue from a VCO in Contract. If a new issue approval workflow is configured, the issue automatically goes to the New Issue log with an Issue ID of Pending. It does not get an issue ID until it is approved.
When you click on an issue’s ID or name, the issue’s record page opens. At the top of the page, a header section provides workflow and status information that you can update during the issue’s lifecycle.

The Issue, PCO, and CCO shows the breakdowns of cost, billing markup, markup, markup percent, and deduction fields. This gives you the visibility into the profit you are making on an issue or change.
The Cost is the total of all priced items. The Billing markup is the markup based on the resource billing rates. The Markup is the total of all markups from the cost item, Pricing tab, PCO, and CCO. The Markup %is the markup divided by the cost. Deductions come from the cost item pricing tab and are subtracted from the current value. Current value is costs plus markups minus deductions.
The status information lets you see issue status information at a glance. The statuses include the following:
Issue status (called PCO status or CCO status on their respective tabs)
Pricing status
Proposal status
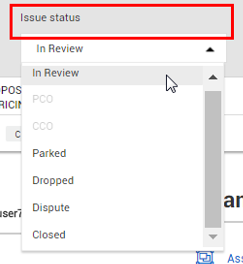
The Issue Status drop-down menu is used to define the general progress of an issue, potential change order, or client change order and is the primary indicator used to determine what action is needed next and by whom. It is used to track the change through the different stages in the change management process, highlighting its progress from issue creation and review through CCO execution. Depending on the selection, fields in the selected issue, PCO, or CCO become locked.
The following are examples of statuses you can assign. Your organization or project might have configured custom statuses:
In Review – The issue is currently being reviewed.
PCO – The issue is now connected to a Potential Change Order.
CCO – The issue now converted to a Client Change Order.
Parked – The issue is no longer active but may be brought up again later. When selected, all fields within the issue become locked.
Dropped – The issue is no longer being considered. When selected, all fields within the issue become locked.
Dispute – The issue is under dispute.
Closed - The issue is closed. You cannot split a closed issue or associate it to a Potential Change Order (PCO) or Client Change Order (CCO).
Changes made to Issue status open a dialog box where you can add notes related to the assignment you are making. Notes are not mandatory to save the change but canceling the dialog box causes the Issue status to revert to the previous state.
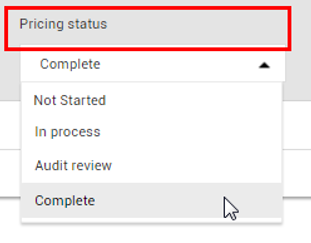
The Pricing status is used to track the progress of all financial activities related to a change, from initial ROM or cost estimation to the final pricing agreement with the client. This field defines the current state of the financial evaluation for the Issue, PCO, or CCO. It can be used to track the entire pricing life cycle, including cost gathering from vendors, internal estimation, review, and formal submission to the client.
You can select the Pricing status drop-down menu to classify where you are in the process of pricing the issue. Options include the following:
Complete
Not Started
In Process
Audit Review
Complete
When changing the Pricing status, you are prompted to record notes just like you were when changing the other statuses.
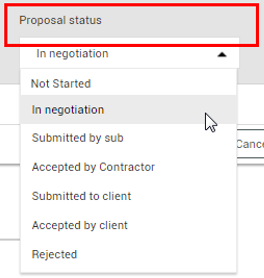
The Proposal status is used to track the life cycle of the official proposal package, from initial negotiations to submission and approval to the subcontractor or client. This field defines the current state of the formal written proposal that bundles all budgetary, scheduling, and technical details for a change. It is used to track the progress of the official client-facing document, distinguishing it from internal pricing and general status.
Select the Proposal status drop-down menu to classify the proposal status of the issue. Options include:
Not started
In negotiation
Submitted by sub
Accepted by Contractor
Submitted to client
Accepted by client
Rejected
When changing the Proposal status, you are prompted to record notes just like you were when changing the other statuses.
You can delete issues from the Issue log that were entered in error or are no longer valid. The issues must meet certain criteria based on their status, PCO or CCO association, and origin.
You can delete an issue if it meets the following criteria:
The issue must have been created in Change or added via an API. Issues that originate from another InEight product, such as Plan, Progress, Compliance, Contract, or Document cannot be deleted.
The issue must have a status of New, Parked, Dropped, or a custom status.
The issue cannot be associated with a PCO, CCO, or budget move.
The issue cannot be a main issue.
If you delete the issue with the highest number, the next issue created will take that number. If you delete an issue with a number in the middle of the list, that number is not used again.
To delete issues, select one or more issues from the Issue log, and then click the Delete icon. You must have the permission Delete issues.
Additional Information
9977 N 90th Street, Suite 250 Scottsdale, AZ 85258 | 1-800-637-7496
© 2024 InEight, Inc. All Rights Reserved | Privacy Statement | Terms of Service | Cookie Policy | Do not sell/share my information